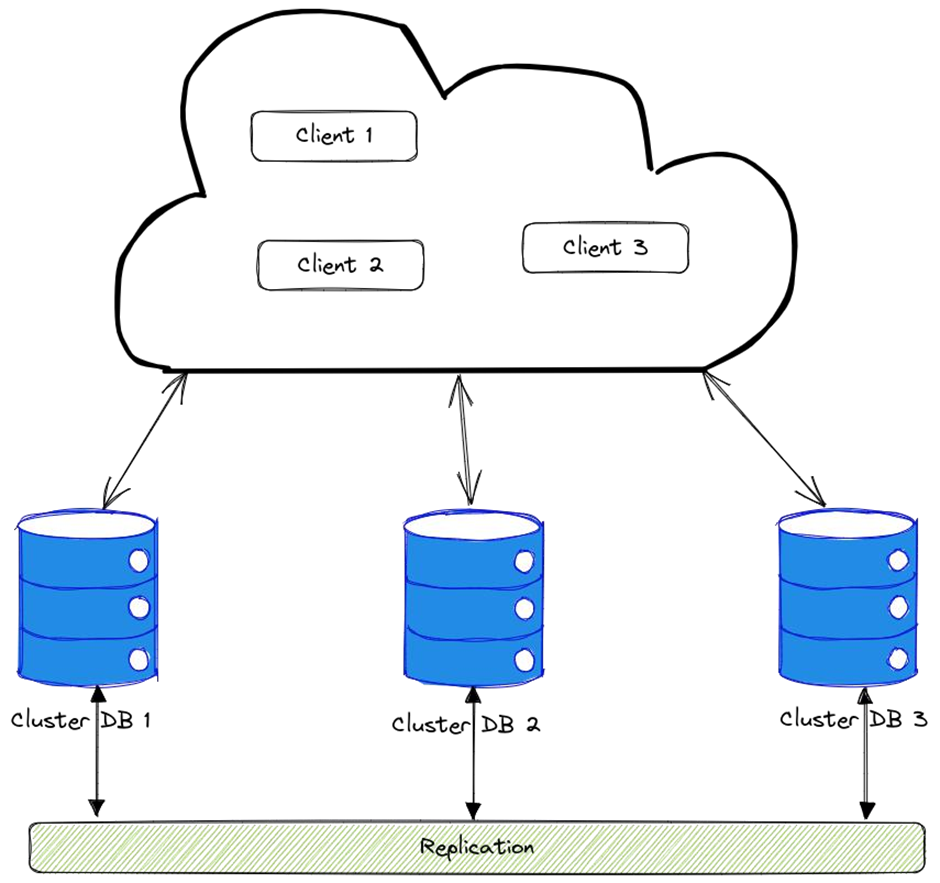
ProxySQL is a high-performance proxy for MySQL and MariaDB servers. When deployed as a ProxySQL cluster, it enables dynamic routing of SQL traffic across multiple backend database servers, ensuring high availability and efficient workload management.
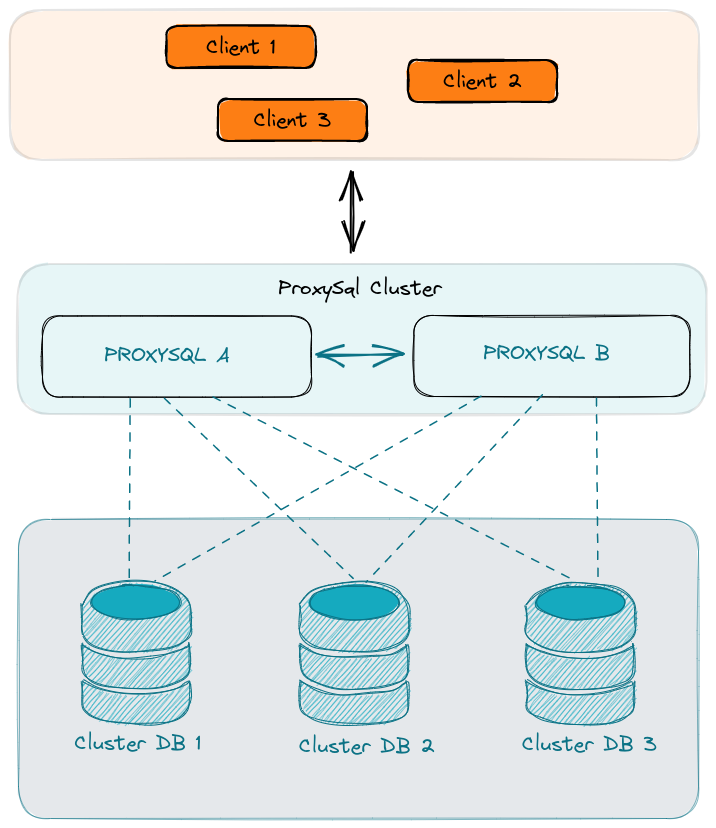
Table of Contents
ProxySQL Installation
In this guide we will be deploying ProxySQL cluster on Ubuntu 22.04 with ProxySQL 2.4.8. Two ProxySQL nodes are set up in front of a MariaDB Galera cluster to handle traffic load balancing and automatic failover for client applications.
Now we will install ProxySQL on both nodes, after that we will add the proxysql repo to the apt sources directory and install the proxysql package.
Use the below command to downloads the public key for the ProxySQL repository and adds it to the list of trusted keys for the APT package manager on your system.
wget -qO- 'https://repo.proxysql.com/ProxySQL/proxysql-2.4.x/repo_pub_key' | \
sudo tee /etc/apt/trusted.gpg.d/proxysqlrepo.asc
To add the ProxySQL APT repository to your system, allowing you to install ProxySQL using your package manager you can use the below command.
echo deb https://repo.proxysql.com/ProxySQL/proxysql-2.4.x/$(lsb_release -sc)/ ./ | \
sudo tee /etc/apt/sources.list.d/proxysql.list
Now update the apt cache and then install the proxysql and mariadb client using below command:
sudo apt-get update
sudo apt-get install proxysql mariadb-client-core-10.6
ProxySQL Communication Ports
ProxySQL servers utilize specific ports for different communication needs, such as interaction between cluster members, administrative tasks, and client connections.
MySQL Port: 6033
For MySQL clients connection with the SQL proxy frontend.
ProxySQL Administration Port: 6032
ProxySQL administrative CLI interface for managing configuration and operations. The cluster members also communicate with each other on this port.
ProxySQL Web Interface Port: 6080
Web interface for monitoring and statistics of ProxySQL
ProxySQL API Interface Port: 6070
ProxySQL API interface.
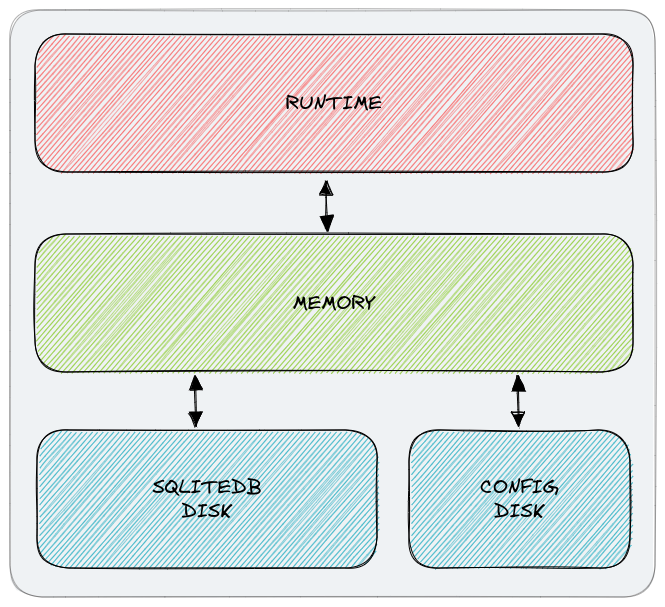
ProxySQL Configuration System
ProxySQL has a multiplayer configuration system. The initial configuration (bootstrap) is done via text configuration file (/etc/proxysql.cnf). When ProxySQL is first started, it reads this file and saves the settings into an SQLite database (/var/lib/proxysql/proxysql.db). On every subsequent restart, ProxySQL uses the data from this SQLite database to load the configuration, bypassing the text file.
If you need to reinitialize the configuration from the text file then you needs to start proxysql with initial option.
systemctl start proxysql-initialAfter starting, the configuration is loaded into memory and applied to the runtime, which reflects the current operational settings of ProxySQL.
ProxySQL Bootstrap
Configure the ProxySQL initial configuration file (/etc/proxysql.cnf) on both the Proxy nodes with initial admin and cluster credentials, IP and names of the proxysql nodes. This will create a Proxy cluster between the two nodes.
datadir="/var/lib/proxysql"
errorlog="/var/lib/proxysql/proxysql.log"

admin_variables=
{
	admin_credentials="admin:ADMINPASS;sqlcluster1:SOMESECUREPASS"
	mysql_ifaces="0.0.0.0:6032"
	web_enabled=true
	web_port=6080
	stats_credentials="stats:STATSPASS"
	cluster_username="sqlcluster1"
        cluster_password="SOMESECUREPASS"
        cluster_check_interval_ms=200
        cluster_check_status_frequency=100
        cluster_mysql_query_rules_save_to_disk=true
        cluster_mysql_servers_save_to_disk=true
        cluster_mysql_users_save_to_disk=true
        cluster_proxysql_servers_save_to_disk=true
        cluster_mysql_query_rules_diffs_before_sync=3
        cluster_mysql_servers_diffs_before_sync=3
        cluster_mysql_users_diffs_before_sync=3
        cluster_proxysql_servers_diffs_before_sync=3
}

proxysql_servers =
(
	{
        	hostname="192.168.1.1"
        	port=6032
        	comment="sqlproxyA"
	},
	{
        	hostname="192.168.1.2"
        	port=6032
        	comment="sqlproxyB"
	}
)

mysql_variables=
{
	threads=4
	max_connections=2048
	default_query_delay=0
	default_query_timeout=36000000
	have_compress=true
	poll_timeout=2000
	interfaces="0.0.0.0:6033"
	default_schema="information_schema"
	stacksize=1048576
	server_version="5.5.30"
	connect_timeout_server=3000
	monitor_username="monitor"
	monitor_password="monitor"
	monitor_history=600000
	monitor_connect_interval=60000
	monitor_ping_interval=10000
	monitor_read_only_interval=1500
	monitor_read_only_timeout=500
	ping_interval_server_msec=120000
	ping_timeout_server=500
	commands_stats=true
	sessions_sort=true
	connect_retries_on_failure=10
}

# defines all the MySQL servers
mysql_servers =
(
)


# defines all the MySQL users
mysql_users:
(
)

#defines MySQL Query Rules
mysql_query_rules:
(
)

scheduler=
(
)

mysql_replication_hostgroups=
(
)
ProxySQL Initial Configuration
After the startup both nodes will form a cluster. The nodes will compare checksums for various configuration sections and synchronize updates when changes are detected.
On one of the ProxySQL nodes, access the CLI interface using the initial admin password set during the bootstrap process. Change the admin password, load the configuration to RUNTIME and save to DISK.
$ mysql -u admin -p -h 127.0.0.1 -P6032 --prompt='SQL Admin> '
Enter password:
Welcome to the MariaDB monitor.  Commands end with ; or \g.
Your MySQL connection id is 970804
Server version: 5.5.30 (ProxySQL Admin Module)

Copyright (c) 2000, 2018, Oracle, MariaDB Corporation Ab and others.

Type 'help;' or '\h' for help. Type '\c' to clear the current input statement.

SQL Admin> UPDATE global_variables SET variable_value='admin:SECUREPASS;sqlcluster1:SOMEPASS' WHERE variable_name='admin-admin_credentials';

SQL Admin> LOAD ADMIN VARIABLES TO RUNTIME;
SQL Admin> SAVE ADMIN VARIABLES TO DISK;
ProxySQL conducts status checks on the backend SQL nodes. To perform these checks, a user with the necessary privileges on the MySQL and MariaDB servers is required. You need to create a user on the backend databases with the appropriate permissions for ProxySQL to perform these status checks effectively.
Ensure that the user has the proper privileges to allow ProxySQL to monitor and manage the backend SQL nodes accurately.
$ mysql -u root -p

> CREATE USER 'mysql-monitor'@'%' IDENTIFIED BY 'SOMEPASSWORD';
> GRANT SELECT on sys.* to 'mysql-monitor'@'%';
> FLUSH PRIVILEGES;
Update the monitoring user and password global variables in the ProxySQL configuration. Load the configuration into RUNTIME and also save it to DISK.
$ mysql -u admin -p -h 127.0.0.1 -P6032 --prompt='SQL Admin> '
Enter password:

SQL Admin> UPDATE global_variables SET variable_value='mysql-monitor' WHERE variable_name='mysql-monitor_username';

SQL Admin> UPDATE global_variables SET variable_value='SOMEPASSWORD' WHERE variable_name='mysql-monitor_password';

SQL Admin> LOAD ADMIN VARIABLES TO RUNTIME;
SQL Admin> SAVE ADMIN VARIABLES TO DISK;
ProxySQL Cluster Backend Servers Configuration
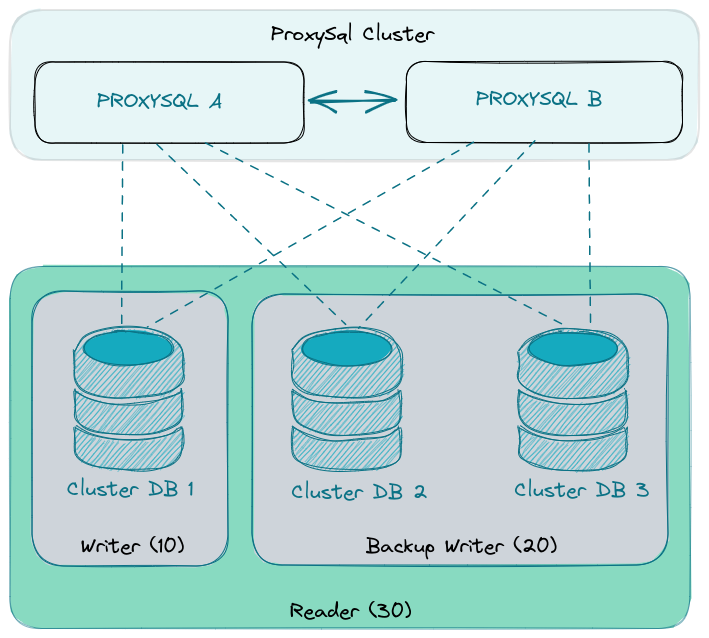
ProxySQL can be used to distribute Read/Write SQL traffic to different database servers. ProxySQL can monitor health status of Galera nodes and can distribute the traffic based on the status of the nodes. All MariaDB Galera cluster nodes can perform read (SELECT) and write (INSERT/UPDATE/DELETE) operations. We will configure the ProxySQL nodes to configure one node as primary writer, and the other two nodes as backup writers. Also the primary writer will not perform read operations. The read will be done by the both backup-writers as they are not performing write operations.
We will configure three database groups with group IDs. Writer with group ID 10, Backup-Writer ID 20, and Reader ID 30. We can also define separate weights for the servers to distribute traffic as per the weight.
Configure the backend database servers with group ID 10 and with weights to distribute the SQL traffic as per the weights.
$ mysql -u admin -p -h 127.0.0.1 -P6032 --prompt='SQL Admin> '
Enter password:

SQL Admin> INSERT INTO mysql_servers(hostgroup_id,hostname,port,weight) VALUES (10,'mariadb1.domain.com',3306,100);

SQL Admin> INSERT INTO mysql_servers(hostgroup_id,hostname,port,weight) VALUES (10,'mariadb2.domain.com',3306,80);

SQL Admin> INSERT INTO mysql_servers(hostgroup_id,hostname,port,weight) VALUES (10,'mariadb3.domain.com',3306,40);
Configure following galera host parameters:
- writer_hostgroup Group ID of writer group (10)
- backup_writer_hostgroup Group ID of backup-writer group (20)
- reader_hostgroup Group ID of reader group (30)
- offline_hostgroup Group ID assigned for offline hosts (999)
- active Enable the host group configuration (1)
- max_writers Number of writers (1)
- writer_is_also_reader Backup-writers are placed in readers group (2)
- max_transactions_behind
SQL Admin> INSERT INTO mysql_galera_hostgroups (writer_hostgroup,backup_writer_hostgroup,reader_hostgroup,offline_hostgroup,active,max_writers,writer_is_also_reader,max_transactions_behind)
VALUES (10,20,30,999,1,1,2,30);
Load the configuration to RUNTIME and save the configurations to DISK.
SQL Admin> LOAD MYSQL SERVERS TO RUNTIME;
SQL Admin> SAVE MYSQL SERVERS TO DISK;
Verify the status of the configured SQL servers. The servers will be placed in appropriate groups automatically as per the above configured galera host parameters. There should be one ONLINE server in the group 10 which is the writers group and the other two should be SHUNNED as we have configured one max_writers. There should be two backup-writers ONLINE in group 20 and two readers ONLINE in group 30.
SQL Admin> select hostgroup_id,hostname,status from runtime_mysql_servers;
+--------------+---------------------+---------+
| hostgroup_id | hostname            | status  |
+--------------+---------------------+---------+
| 10           | mariadb1.domain.com | ONLINE  |
| 10           | mariadb2.domain.com | SHUNNED |
| 10           | mariadb3.domain.com | SHUNNED |
| 20           | mariadb2.domain.com | ONLINE  |
| 20           | mariadb3.domain.com | ONLINE  |
| 30           | mariadb2.domain.com | ONLINE  |
| 30           | mariadb3.domain.com | ONLINE  |
+--------------+---------------------+---------+
Configure SQL query rules to send traffic towards group ID 10 for INSERT,UPDATE,DELETE statements, send to group ID 30 for all SELECT statements. All remaining SQL queries will be sent to group 10.
INSERT INTO mysql_query_rules(rule_id, active, match_digest, destination_hostgroup, apply) VALUES (100, 1, '^SELECT.*', 30, 1);
INSERT INTO mysql_query_rules(rule_id, active, match_digest, destination_hostgroup, apply) VALUES (200, 1, '^(INSERT|UPDATE|DELETE).*', 10, 1);
INSERT INTO mysql_query_rules(rule_id, active, match_digest, destination_hostgroup, apply) VALUES (300, 1, '.*',10, 1);
Load the QUERY rules to RUNTIME and also save on DISK.
SQL Admin> LOAD MYSQL QUERY RULES TO RUNTIME;
SQL Admin> SAVE MYSQL QUERY RULES TO DISK;
Verify the queries being sent to each group after the above query rules.
SQL Admin> SELECT hostgroup hg, sum_time, count_star, SUBSTR(digest_text,0,30) FROM stats_mysql_query_digest ORDER BY sum_time DESC LIMIT 30;
+----+---------------------+------------+-------------------------------+
| hg | sum_time            | count_star | SUBSTR(digest_text,0,30)      |
+----+---------------------+------------+-------------------------------+
| 30 | 6531513589          | 2550640    | SELECT option_value FROM wp_o |
| 30 | 2547573177          | 963721     | SELECT option_value FROM wp_o |
| 30 | 1328684849          | 229519     | SELECT option_name,option_val |
| 10 | 1275462649          | 259448     | insert into `tac_log_accounti |
| 30 | 1212585016          | 227207     | SELECT @@SESSION.sql_mode     |
| 30 | 762140599           | 123960     | SELECT option_name,option_val |
| 30 | 730115821           | 223835     | SELECT wp_posts.* FROM wp_pos |
| 30 | 728625532           | 223838     | SELECT DISTINCT t.term_id,tr. |
| 30 | 689907415           | 228661     | SELECT t.*,tt.* FROM wp_terms |
| 30 | 658571862           | 121566     | SELECT @@SESSION.sql_mode     |
| 30 | 640092906           | 223717     | SELECT wp_posts.ID      FROM  |
| 30 | 639786790           | 223716     | SELECT YEAR(post_date) AS `ye |
| 30 | 637661800           | 223716     | SELECT t.term_id    FROM wp_t |
| 30 | 633224054           | 221509     | SELECT SQL_CALC_FOUND_ROWS wp |
| 30 | 633012547           | 223837     | SELECT post_id,meta_key,meta_ |
| 30 | 630648788           | 221487     | SELECT user_id,meta_key,meta_ |
| 30 | 626123776           | 223716     | SELECT wp_comments.comment_ID |
| 30 | 594210809           | 221078     | SELECT t.*,tt.* FROM wp_terms |
| 30 | 593318056           | 223718     | SELECT term_id,meta_key,meta_ |
| 10 | 588576261           | 109352     | insert into `tac_log_authenti |
| 30 | 581848347           | 221487     | SELECT * FROM wp_users WHERE  |
| 30 | 557889860           | 222013     | SELECT FOUND_ROWS()           |
| 30 | 507853319           | 181268     | SELECT * FROM wp_posts WHERE  |
| 30 | 347074389           | 121566     | SELECT a.hook FROM wp_actions |
| 30 | 327391971           | 118212     | SELECT wp_posts.*    FROM wp_ |
| 30 | 326569719           | 118212     | SELECT post_id FROM wp_postme |
| 30 | 321290650           | 118213     | SELECT ID,post_name,post_pare |
| 10 | 280436491           | 409356     | set names ? collate ?         |
+----+---------------------+------------+-------------------------------+
Create users for the applications. The applications will connect with the given user and the same user will be used to send the queries to the backend servers.
SQL Admin> INSERT INTO mysql_users(username,password,default_hostgroup,transaction_persistent,default_schema,active) VALUES ('dbuser','APPSECUREPASS',10,0,'dbname',1);

Admin> LOAD MYSQL USERS TO RUNTIME;
Admin> SAVE MYSQL USERS TO DISK;
References
https://proxysql.com/documentation/ProxySQL-Configuration/
https://proxysql.com/documentation/galera-configuration/
Hello, Neat post. There’s an issue together with your site in internet explorer, would check this?IE still is the marketplace chief and a large element of other folks will leave out your magnificent writing due to this problem.