From this guide, you will be able to learn how to install and configure Squid Proxy Server on Ubuntu 24.04 so that by the end you will have a fully functional proxy server. Of particular importance to the Web is the Squid proxy server, a caching proxy that operates with HTTP, HTTPS, FTP and other protocols. This makes use of frequently accessed websites and thus minimizes the bandwidth consumption and offers faster responses in the process.
Table of Contents
1. Introduction to Squid Proxy
Today, the proper approach to web traffic flow is highly important for both small and substantial networks. A Proxy Server is localized resource that acts between client systems and internet in order to enhance results, tighten security and manage bandwidth. As for the different types of proxy servers, Squid has many advantages compared to other such tools: it is more versatile, stable, and has a rich functionality.
What is Squid Proxy Server?
Squid is an open source web proxy cache that acts as a server for browsed web content with an aim of enhancing the experience of users when browsing the internet. This means that when a user wants a certain web page the Squid software will store a copy of the page. If another user wants the same page, Squid can retrieve it from cache as opposed to retrieving from the original source, thereby improving the likelihood of quick responses and low bandwidth consumption. FTP, HTTP and HTTPS are some features supported by the Squid solution that makes it usable with several networks.
Benefits of Using Squid Proxy Server
- Bandwidth Optimization: In this way, the popular content and the frequently visited websites are partially translated into Squid, which actually decreases load of data requiring Internet connection. It is useful in cases where there is poor connectivity to the internet or where the internet is expensive. Local content is delivered from the cache, so the viewer gets a reply more quickly and with less information traffic.
- Improved Performance: Through its optimization algorithms, Squid decreases the latency level and application load time. Web resources become accessible to the users with higher speed; this is especially important for business and educational institutions where every second counts.
- Enhanced Security: Squid in this context also operates as a barrier between the client devices and the over internet hence serving as an added security layer. It can manage incoming and outgoing traffic, restrict the access to certain sites, and etc. This affords them the much needed security against known cyber threats and any forms of intrusion on the network.
- Access Control and Monitoring: Squid is also enables administrators to set the proxy accessibility and type of contents to allow and restrict or ban through what it refers to as access control lists commonly known as ACLs. It is easy to track and configure comprehensive logs in the server thus giving web administrators full visibility and control over usage.
- Cost Savings: Squid can save a lot of money, because Squid minimizes the bandwidth consumption, and increases the effectiveness of the networks. It means that organizations would not have to buy costly bandwidth on their internet and might effectively use internet resource.
Use Cases for Squid Proxy Server
Squid is used in a variety of settings, each benefiting from its robust features and flexibility:
- Educational Institutions: It has helped school and universities in particular to control and oversee the use of the internet for learning, as well as for the employees of any institution. It can help in restricting users or groups from accessing certain web contents such as pornographic sites in order to improve system security and compliance with usage policies.
- Corporate Networks: Companies use Squid to manage their network, improve bandwidth consumption, protect from dangerous sites, and establish company internet standards. Squid contributes in cutting down on recovery period of important business applications and websites reducing on productivity issues.
- Internet Service Providers (ISPs): Most of the times, ISPs employ Squid in order to offer web caching services to their subscribers. Since this content can be cached, ISPs can conserve the upstream bandwidth and enhance the experience of customers using Internet.
- Data Centers: Companies use Squid in data centers to filter and cabin traffic in web content. Load balancing and caching capabilities of Squid are beneficial in increasing server capacity of volumes of requests which are crucial in easily and efficiently accessing web resources.
- Home Networks: Tech lovers and computer-savvy individuals install Squid to regulate network accessibility for their household members who engage in Internet usage. With Squid, it is possible to track the consumed bandwidth and filter out undesired sites that may be potentially harmful to a networked device on the Internet.
Why Ubuntu 24.04?
Ubuntu is most preferred in setting up Squid Proxy Server because of its stability, secure nature and the ease of using it. Ubuntu is one of the leading Linux distros; it offers a very stable and secure base, and there are updates frequently and the community is very active. Ubuntu 24. 04 being the latest version of LTS guarantees that you get the latest features updates and security updates, and is therefore suitable for installing a stable and secure squid proxy server.
Scope of This Guide
It is the intention of guide to establish a clear and detailed process in regards to installation and setup of Squid Proxy Server on Ubuntu 24. 04. Regardless of whether you are new to the system or have been using it for a while now, you will find that this guide will contain aspects ranging from the basics of installation to some of the most elaborate complexities for setting up one or many systems. After going through the entire guide, you will be having a customized Squid proxy server installed that will provide all the required functionality to enhance as well as secure the network traffic.
Moving to the subsequent sections, this guide will provide an introduction to Squid proxy, the requirements on creating Squid, steps to install Squid, and specific settings to help to make Squid proxy server swift, protected, and stable.
2. Installing Squid Proxy Server on Ubuntu 24.04
Before installing, ensure your system meets the following requirements:
- Have root or sudo privileges on your server.
Update your system packages to the latest versions:
apt update && apt upgrade -yStep 1: Install Squid
The latest version of Squid can be installed from Ubuntu’s package repositories.
apt install squid -y

Step 2: Verify the Installation
After the process is complete you can check the version installed using the below command:
squid -vYou should see output similar to this, confirming the installed version of Squid:
root@squid:~# squid -v
Squid Cache: Version 6.10
Service Name: squid

3. Squid Configuration:
Before making any changes, create a backup of the original Squid configuration file:
cp /etc/squid/squid.conf /etc/squid/squid.conf.bkpYou can go to the directory by using a cd command:
cd /etc/squid
Open the Squid configuration file using your preferred text editor:
nano squid.confWithin the configuration file, you can set basic options such as the HTTP port and access control lists (ACLs). By default, Squid listens on port 3128. You can change this by modifying the HTTP port directive:
http_port 3128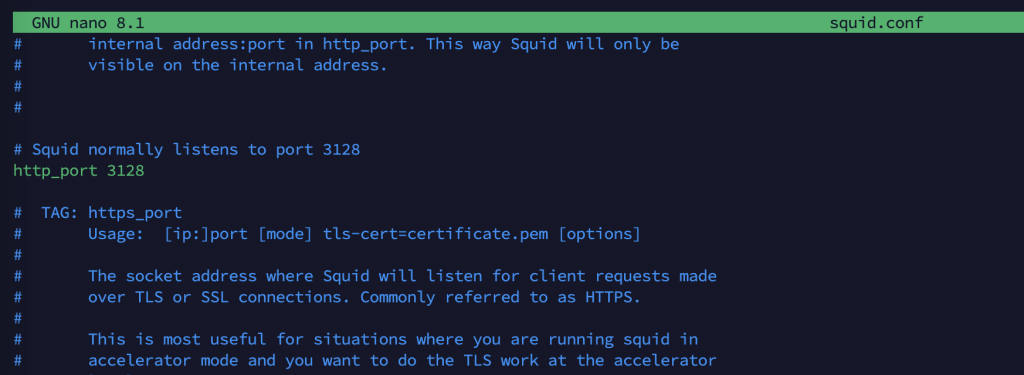
Save the changes and exit the text editor (Ctrl + O, Enter, Ctrl + X in Nano).
How to allow IPs in Squid proxy:
Now we need to allow the IPs that can connect with squid proxy. To allow access from specific IP ranges, define ACLs and allow rules. For example, to allow access from the 172.16.1.0/24 network:
nano /etc/squid/allowed_ips
Now we need to add it in the squid configuration file:
acl allowed src "/etc/squid/allowed_ips"
http_access allow allowed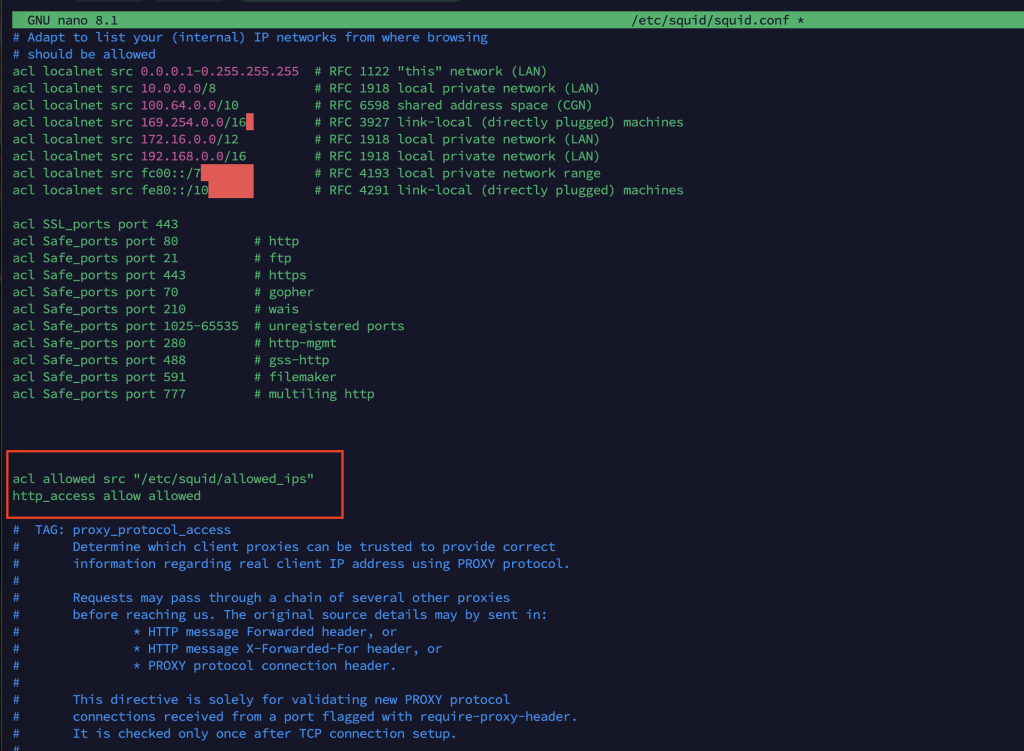
Save the changes and exit the text editor (Ctrl + O, Enter, Ctrl + X in Nano).
For the changes to take effect, restart the Squid service:
systemctl restart squid4. Advanced Configuration
How to configure Caching in squid proxy
To optimize web performance, adjust the caching settings in the Squid configuration file. Locate the following directives and modify them according to your needs:
cache_dir ufs /var/spool/squid 100 16 256

maximum_object_size 4096 KB

minimum_object_size 0 KB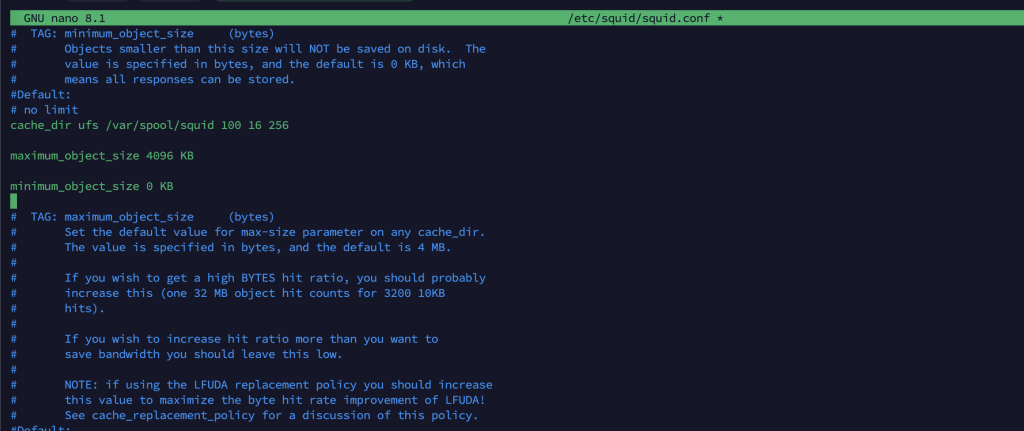

How to Enable Logging in squid proxy
Squid has many log options for observing traffic flow and troubleshooting, and it has advanced caching capabilities as well.
access_log /var/log/squid/access.log

cache_log /var/log/squid/cache.log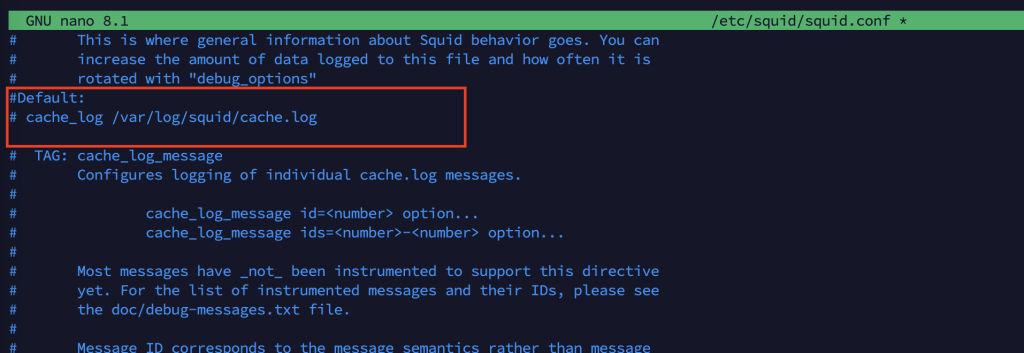
How to configure Authentication in Squid proxy
To enhance security you can ensure that the proxy is only accessible by users who undergo a verification process. Squid supports authentication type like Basic and LDAP.
- Install the Apache utilities package:
sudo apt install apache2-utils -y- Create a password file and add a user:
sudo htpasswd -c /etc/squid/passwords muhammadWe can put any username in this place.
- Configure Squid to use the password file for authentication:
auth_param basic program /usr/lib/squid/basic_ncsa_auth /etc/squid/passwords

auth_param basic children 5

auth_param basic realm Squid proxy-caching web server

auth_param basic credentialsttl 2 hours

acl authenticated proxy_auth REQUIRED

http_access allow authenticated
4. Securing Your Proxy Server
Step 1: Restrict Access to Specific Ports
Hence one should limit the ports that Squid can utilize in a bid to curb misuse by unauthorized individuals.
acl Safe_ports port 80 # http acl Safe_ports port 443 # https acl Safe_ports port 21 # ftp http_access deny !Safe_portsStep 2: Enable SSL Bumping
To ensure clients’ connections are secure and are being served through HTTPS, do SSL bumping. With the help of this feature Squid is capable to decrypt and analyze HTTPS traffic. However, it is important to note that SSL bumping necessitates the ability to apply further adjustments and it has to adhere to legislative standards. Here’s a basic example:
- Generate a self-signed certificate:
sudo mkdir /etc/squid/ssl_certsudo openssl req -new -newkey rsa:2048 -days 365 -nodes -x509 -keyout /etc/squid/ssl_cert/squid.key -out /etc/squid/ssl_cert/squid.crt- Configure Squid to use the certificate:
http_port 3128 ssl-bump cert=/etc/squid/ssl_cert/squid.crt key=/etc/squid/ssl_cert/squid.keyacl step1 at_stepSslBump1 ssl_bump peek step1ssl_bump bump allStep 3: Regular Updates
Be certain to update Squid and your system packages for various modules frequently to latest version to avoid security issues:
sudo apt update && sudo apt upgrade -y6. Testing the Squid Proxy
Step 1: Configure a Client Machine
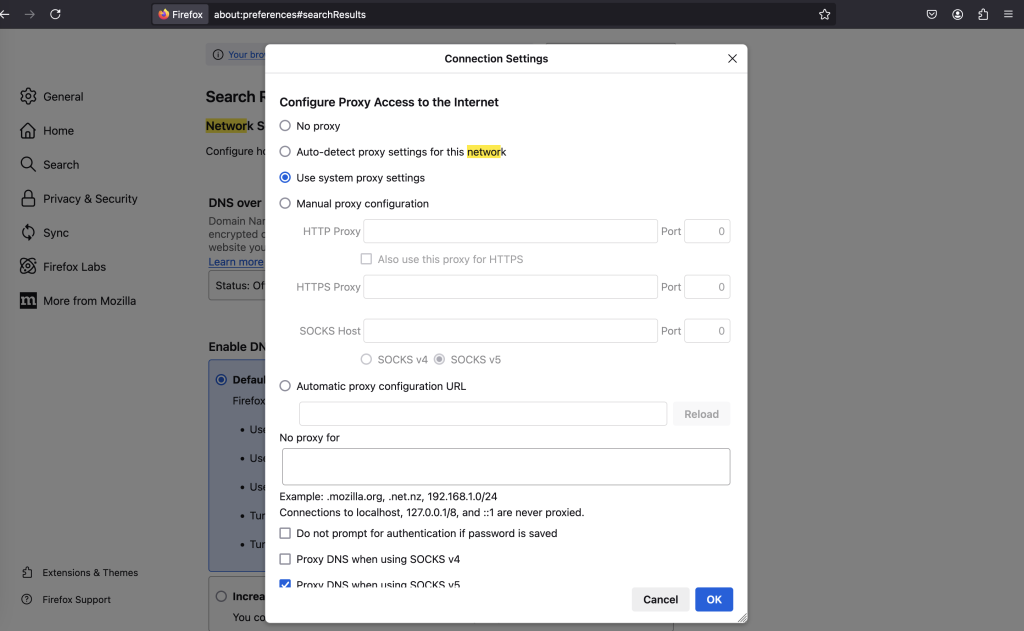
At the client site, the appropriate settings of the web browser or the operating system must then be set to employ the Squid proxy. For example, in Firefox:
- Go to Preferences > Network Settings > Settings.
- Select Manual proxy configuration.
- Enter the Squid server’s IP address and port (e.g., 192.168.1.1:3128).
Step 2: Verify Proxy Functionality
A get a Web site from the client node. Look into the Squid access log to see if there is activity in terms of traffic being routed through the proxy:
tail -f /var/log/squid/access.logYou should see log entries indicating successful connections.
7. Monitoring and Maintenance
Stepll1: Monitor Logs
Ensure that you routinely check for any issues or otherwise suspicious entries written in Squid logs. In the current step, make use of structural commands like tail and grep, in order to extract specific entries from logs:
tail -f /var/log/squid/access.logStep 2: Set Up Log Rotation
However, to ensure that the log files do not grow large and eat up disk space, use the logrotate utility to periodically manage log files. Recently, I wrote a guide on how to setup a logrotate configuration file for Squid which I would like to share with other users:
sudo nano /etc/logrotate.d/squidAdd the following content:
/var/log/squid/*.log {
Daily

rotate 7

compress

 missingok

notifempty

delaycompress

postrotate

/usr/sbin/squid -k rotate

endscript }
Step 3: Monitor Performance
Monitoring tools such as htop, iostat, etc has to be used in testing periodic system performance:
htop iostat -xz 19. Troubleshooting
Common Issues and Solutions
- Squid Not Starting: Check the Squid error log for detailed error messages:
sudo tail -f /var/log/squid/cache.log- Access Denied Errors: Confirm that all your ACLs and access rules under the Squid configuration file are properly defined.
- Performance Issues: Adjust the cache appropriately and examine other network issues or hardware problems.
8. Conclusion
I believe that downloading, setting up, and using the Squid Proxy Server in Ubuntu 24. 04 is a very fulfilling process despite the fact that it involves several sequential steps. Squid gives the network administrator the power back from the web and allows for more security and operations efficiency. This guide has taken you from the first plug of the device into the computer to more detailed settings adjustments and security considerations.
Advanced Features to Explore
- Content Filtering: Apply filters on content to prevent access to sites containing material which is obscene or is not related to work. This may be particularly helpful for classroom use or professional development workshops.
- Load Balancing: For larger networks, it may be beneficial to deploy multiple Squid proxies an arrange them in cascade, so that the network load will be more equally divided, and the proxies will be able to provide more reliability.
- High Availability: The possibility of a disruption of the Squid relay service should be dealt with by configuring Squid in high-availability setup with failover mechanisms.
- Integration with Other Services: Squid can easily work alongside other security and monitoring technologies such as intrusion detection systems (IDS) and other network monitoring solutions in order to provide a holistic management of the network in question.
Final Thoughts: Squid is also commonly implemented in schools and universities in order to effectively manage and monitor usage of the internal internet to provide a safe productive environment to students and teachers alike.
Corporate Networks: Some of the reasons why business organizations use Squid are as follows: It is used in managing bandwidth utilization, for security of organizational network as well as regulating the use of internet in organizations. ISPs and Data Centers: It’s also important to realize that even independent third-party ISPs and data center providers rely on Squid to handle their caching needs.
Home Networks: Young people with knowledge in technology established Squid at home with the purpose of controlling bandwidth, strengthen security measures and monitor their family members’ usage of the internet.
For more blogs related to Linux do visit our website simplealltech.com
References
- Squid Cache. (n.d.). Squid Cache Documentation. Retrieved June 26, 2024, from http://www.squid-cache.org/Doc/
- Canonical Ltd. (n.d.). Ubuntu Server Guide. Retrieved June 26, 2024, from https://ubuntu.com/server/docs
- Canonical Ltd. (n.d.). Ubuntu Community Help Wiki. Retrieved June 26, 2024, from https://help.ubuntu.com/community
- DigitalOcean. (n.d.). Community Tutorials. Retrieved June 26, 2024, from https://www.digitalocean.com/community/tutorials
- HowtoForge. (n.d.). HowtoForge Linux Tutorials. Retrieved June 26, 2024, from https://www.howtoforge.com
- Tecmint. (n.d.). Tecmint Linux Howtos, Tutorials & Guides. Retrieved June 26, 2024, from https://www.tecmint.com
- Saini, K. (2011). Squid Proxy Server 3.1: Beginner’s Guide. Packt Publishing.
- LaCroix, J. (2018). Mastering Ubuntu Server. Packt Publishing.
- Ubuntu Forums. (n.d.). Ubuntu Forums. Retrieved June 26, 2024, from https://ubuntuforums.org
- Stack Exchange. (n.d.). Stack Overflow. Retrieved June 26, 2024, from https://stackoverflow.com
- Stack Exchange. (n.d.). Server Fault. Retrieved June 26, 2024, from https://serverfault.com
- Logrotate. (n.d.). Logrotate Manual. Retrieved June 26, 2024, from https://linux.die.net/man/8/logrotate
- OpenSSL Software Foundation. (n.d.). OpenSSL Documentation. Retrieved June 26, 2024, from https://www.openssl.org/docs/man1.1.1/man1/openssl.html

Hmm is anyone else having problems with the pictures on this blog loading? I’m trying to find out if its a problem on my end or if it’s the blog. Any responses would be greatly appreciated.